Wednesday, August 1, 2012

Keeping the Wild in Your Heart

I have had three wonderful opportunities recently to work with other artists on projects that required more than one kind of artistic talent.  The first was my Red-shouldered Hawk Territory book, a rewarding project involving a talented layout person and another artist who coordinated the printing.   (visit the link for more details)
The second was our Hummingbird Festival bookmark that was part of an advertising campaign for our 2012 Hummingbird Festival organized by our bird club at Ijams Nature Center as a fund raiser.   The beautiful book mark layout and printing was conceived and coordinated by another talented artist.  (visit the link for more details.)
In my most recent experience I was asked to create "muddy water" that was bubbling as though a turtle was diving into it.  And in a second painting, create a more detailed rendition of a Red-eared slider.  Above and below you can see these two paintings before they were converted into the beautiful exhibit panel they eventually became.  The muddy water was created on a 22 x 30 sheet of watercolor paper, and the turtle below it, on a half sheet, 22 x 14 inches.
Pam Petko-Seus, of Ijams Nature Center in Knoxville, is the talented artist who conceived of this exhibit panel for the Center's Red-slider turtle exhibit, and Colin Hoffman, another exceptional artist at High Resolutions, was able to take Pam's ideas and make them into an exhibit panel aimed at teaching children and adults how to take care of our wild turtles--loving and admiring them without disturbing them.  
My job seemed the easiest to me!  
  

And here are some of the important facts that people should know when tempted to take a wild animal home with them:  
  • Capturing wild animals often threatens species survival in natural habitats and disrupts delicate ecosystems.
  • Wild animals spread disease.
  • Captive breeding does not take the wild out of wildlife.
  • Former pets rarely survive when returned to the wild.
  • Many animals are sold illegally, especially on the internet.
  • It is illegal in the state of Tennessee to possess native wildife without a proper permit. [This may be true in other states, as well.]


Upcoming:
One of My favorite Books:  Drawing and Painting Birds
I'm Getting Ready for Alaska!

Sunday, June 3, 2012

Vickie Henderson's Art Featured in Nooga.com

My art is featured in a lovely article written by Jenni Frankenberg Veal for the June 3rd Lifestyle section of the Chattanooga online newspaper, Nooga.com. 

Jenni, whose free lance writings specialize in family outdoor activities and articles on conservation, makes regular contributions to Nooga.com, a local news website focused on the Chattanooga area in east Tennessee.


Wednesday, April 11, 2012

Red-shouldered Hawk Territory--The Treasure in the Experience

Sometimes we search for the wild in nature and travel to places where we'll likely find the species we're eager to meet.  Other times the wild comes to us quite unexpectedly.
This was the case with a pair of red-shouldered hawks I encountered in a suburban yard while attending a meeting in the spring of 2009.  Not just one hawk, mind you, but a pair of them, moving around within close range, vocalizing loudly as I walked down the driveway to where my parked car waited on the curb.  That they made themselves so visible and apparent was beyond my comprehension.  And for someone like me, who loves birds, especially raptors, that accessibility equated to an invitation to learn more about their lives and their adaptation to suburban activities in their territory.
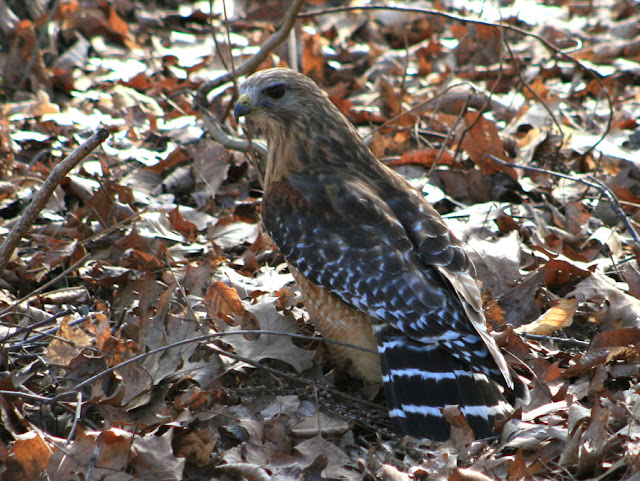
Above you see two image I took as I watched the male in the pair hunt on our third encounter.  Gorgeous birds that both hunt from a perch and on the ground, flipping leaves, listening and watching for movement, and  blending in with the environment. The fact that this species of hawk is very vocal, makes observations even more delightful.  Though their color and patterns allow them to disappear in the wooded habitat they prefer, sooner or later a loud call will alert you to their presence. The suburban location, this chance encounter, their adaptation to human presence and activity, all came together to allow me opportunity to witness the most intimate of moments with this pair.  And those moments included nesting, copulation, nuptial feedings, plucking fresh evergreen sprays for the nest, and even seeing the bare pink flesh of the female's brood patch through my camera's lens.

From a surprise introduction to completed sketches, to the beautiful printed sketchbooks that arrived this week, this was a memorable journey I will always treasure.  All I could say when I held one of these books in my hand was "wow!"
I'm a person who loves books, the books with a spine and pages you can leaf through, the ones you curl up with in a comfortable chair.  I think they are precious.  I love reading them, writing them, and, I love sketching and creating them.
The making of a book brings other skills to bear and can make an artist dig deeper to realize this goal.  This endeavor is one of determined cooperation and negotiation, as much about patience, communication, and team work, as the artistic vision that conceived the idea and moved the project forward.   And now I've found the right team (see links and resources).  The book is beautiful, so life-like in its replication of the sketchbook itself, that it's hard to tell the difference between the original book and it's mirror in print.    
And that makes me smile.  It is the greatest hurdle you go through in printing art in any form.  And this book is about art and nature, about observing and capturing what you've observed in words and drawings, and about learning what your subject has to teach you, even the parts you are not allowed to know.

It's a tiny book, by book standards, replicating the size of the sketchbook, but enormous in heart and inspiration.  I look back on this endeavor--the observing of hawks, most secretive and illusive of creatures--and wonder at the energy and patience that got me through this season of observation.  That I could sit in the shade of a gazebo, and watch their activity as though I were a plant in the garden, astounded me from the beginning.
The observations you see in the book took dedication, the commitment to sit through non-activity hours, make regular visits a priority, the ability to remain still until my subjects appeared and to use my creative mind and curiosity to withstand lulls in activity.  Waiting for the chance to see a hawk and watch its behavior, now that might be an activity some would call a waste of time.  The thought crossed my mind more than once.  But even the wait can be an act of labor, something that keeps you deeply rooted to the project and makes you as determined as ever to see it through.
Creating art is not an activity for the faint of heart.  It challenges you inside and out, especially when that art is focused on something real, and alive and moving, and unpredictable.  You, the artist, are the same, alive, moving,  unpredictable.  But you have trained yourself to be still, knowing what treasures are found while remaining invisible.  And just when you think you might evaporate into nothingness with the waiting, a hawk appears, opens your heart and heightens all your senses.  And a sketch is born, a visual story of all that you've taken in.  Into your heart the hawk flies, and out through your hand and onto the paper.  

This is the essence of Red-shouldered Hawk Territory, A sketchbook journey through nesting season--the story of one season's natural wonder through the heart and hand of an artist.  I hope it inspires you to pick up a sketchbook and let your own story unfold.  


For more details about this sketchbook and to order visit:  Red-shouldered Hawk Territory.  

You will find all my posts on my experiences in Red-shouldered Hawk territory by clicking this link.  The last post will appear first.  Scroll to the bottom and click "older" to move backward to the first post.  

For more information about the species, visit Cornell's site on Red-shouldered Hawks.    

Monday, March 5, 2012

Join Me! Bird Attitudes: Inspiring Art and Conservation

Join me,  Wednesday, March 7th, at the Knoxville Tennesseee Ornithological Society meeting (KTOS) for an evening of photos, art and stories as I show you how birds inspire my art and my passion for conservation.
Birds are funny, fun and fascinating.  From the top of their heads to the pads on their feet, a birds size, color and shape offer many clues into its life style and habits.   Add to that, the personality revealed through behavior and you have the inspiration for all kinds of bird-related pursuits, including advocacy and conservation.
Join me as I share my photography, art and stories, and show you just what inspires me to pick up my brushes and paint.

Sunday, February 26, 2012

America's Hooded Crane

A secretive bird whose breeding territories were only first discovered in 1974, the Hooded Crane is described as one of the least understood large birds in the world. And that is primarily because it nests in the remote and inaccessible sphagnum bogs scattered through the taiga in southeastern Russia, and in China, in forested wetlands in mountain valleys.
I saw my first Hooded Crane at the International Crane Foundation in Baraboo, Wisconsin, in 2005.  And I saw my second at the Hiwassee Wildlife Refuge in Tennessee in December of 2011.  What was a Hooded Crane doing in the southeastern United States?  No one knows for certain.  But, there is every indication that this individual is wild, and possibly wandered too far west of Siberia, migrating into the United States following sandhill cranes.
Above, a group of Greater Sandhill Cranes feeding near the Hiwassee Wildlife Refuge in Tennessee.  The Hooded Crane stands only 3.3 ft tall while the Greater Sandhill Crane may be 4-5 ft tall.

In February, 2012, this Asian crane visitor left Tennessee and was next seen staging with sandhill cranes at the Goose Pond Wildlife Management Area in Green County, Indiana.  It stayed approximately four days and was last seen February 12th.  Birders are watching for it in more northerly sandhill crane staging areas.

I have recently written a three-part series on the endangered Hooded Crane, threats to its native habitat, and its visit to the southeast on my companion blog, Vickie Henderson Art.  The series, entitled, America's Hooded Crane, includes beautiful images taken by Chinese researcher, Dr. Guo Yumin, of the Hooded Crane on its breeding territory, along with slides explaining how to distinguish individual hooded canes.  

On this blog:  Sandhill Cranes and Art and Whooping cranes in watercolor

Sunday, February 5, 2012

Preview of My New Book! Red-shouldered Hawk Territory


My Red-shouldered hawk sketchbook will soon be in print!

I've combined my entire sketchbook of watercolor and ink illustrations with additional sketches and observation notes to create a book designed to both inspire and entertain.

Below you'll find a detailed description of the book and easy pre-order instructions!

Red-shouldered Hawk Territory, A Sketchbook Journey Through Nesting Season, is the chronicle of my experiences while sketching and observing a nesting pair of suburban Red-shouldered hawks.

Encountering these hawks quite by accident and in the unlikely circumstance of a business meeting, they immediately captured my intrigue with their acceptance of humans and their accessibility. Even as I embarked on this four-month journey, I never expected to witness the intimate behaviors I encountered, nor the surprising interactions that helped me strike the important balance between observation and interference.  

As much a book for the aspiring naturalist as the artist, Red-shouldered Hawk Territory will take you deep into the lives of these hawks and into the personal experiences, both delightful and frustrating, that transformed this endeavor into a journey of discovery.

I hope reading and browsing this journal will inspire your thoughts, stir questions, make you wonder what you would have done differently, and, hopefully, send you searching for your own observation opportunity with a favorite species.  

Red-shouldered Hawk Territory includes my sketchbook record
of observations plus additional sketches and notes as I observed this pair of hawks throughout a nesting season.  Sketches include the hawks in many circumstances, as well as, the suburban habitat in which they lived, and the many other species that inhabited Red-shouldered hawk territory.

This simple, 50-page, sketchbook-sized book is packed with full color illustrations and designed to both inspire and entertain the bird-loving artist in everyone!

"Few people have the opportunity to share their yards with Red-shouldered hawks.  But, for all of us, this story is an inspiring example of peaceful co-existence and the joys and rewards of sharing our home territories with wildlife." --Vickie Henderson

Available April 1, 2012 at Vickie Henderson


Sunday, January 29, 2012

The Yellow Glow Behind the Robin--Part II

At this point in my painting, my goal is to add more color to the lower leaves and background so they appear more connected.  In nature this naturally happens as light strikes the subject and surrounding colors are reflected in that light.  We seldom see all the edges of a leaf at a glance, for example.  We see enough to recognize the shape. Some areas will be sharp and clear, others will appear softened or fused with surrounding color and light.  
I chose to place the painting on a table easel for this application of wet-in-wet paint so that water and paint will coat the paper smoothly.  Setting the painting on an easel is one way to do this.  I also pick up the painting and change the angle to direct the flow of paint from time to time.  I use two large containers of water, allowing me to rinse the brush in one, and pick up clean water in the brush from the second.    This allows the paint to remain clear and bright when it mixes with the water in the brush.  
Above, I have wet the paper with my spray bottle and then applied brush strokes of New Gamboge, Quinacridone Gold and Perylene Maroon.  My spray bottle is actually an old hair spray pump bottle salvaged from years past when I used hair spray.  I prefer its fine mist.  As the paint mixture flows down the page, I am using a paper towel to collect the paint pooled on the edge of the tape.  If laid flat to dry, this excess paint and water will flow backward, leaving a washed out bloom. 
I have also tucked a rolled paper towel into the tray of the easel to catch the run off that occurs before I'm ready to wipe it.    
Above you see the additional color added to the lower left corner of the painting. Compare it to the pale color in the right hand corner.     
Above, I have placed a stroke of New Gamboge on the paper and diluted it by spraying it.  I follow this by adding more colors and allowing these to run together and blend on the paper.  You can see the change that occurs in the lower right hand corner below.    
Once this layer of color is dried, I can then paint the leaves and add more color to the surrounding background, a small area at a time as needed, leaving some leaf edges soft, some hard.  I can also add only a little defining color to part of a leaf, letting the rest of it blend with the background, or I can add a lot of detail as in the two larger leaves in front of the robin.   These variations add interest.   

When you are using a bright color in the background, such as the yellow that is used here, remember that you can alter it later with a glaze of another color.  As the painting progressed, I softened some of the yellow by adding a glaze of green (ultramarine mixed with arylide) to some areas, or a pale glaze of one of my reds to other areas.  
If you like color, variety, glazes, a chance to use wet-in-wet and create hard and soft edges, an "anything goes" approach to watercolor, fall leaves are a great subject to play with!

Part I of the Yellow Glow Behind the Robin
On this blog:  wet-in-wet demonstration

Wednesday, January 25, 2012

The Yellow Glow Behind the Robin

Sometimes we take the birds we commonly see for granted, simply because we see them everyday.  If you've never stopped to notice an American Robin, you should take some time to do that soon. Beautiful in coloration, timid at times, boisterous at others, it is a delight to watch their behavior.  
The painting above is one included in my Autumn Birds Note Cards.  The inspiration for this painting came from a whole flock of robins that descended on my dogwood trees a couple of fall seasons ago.  The trees were full of ripe red berries and the robins were making such a commotion with their chirping and fluttering as they plucked the berries, that I spent more than an hour watching and photographing them. Below, you see the initial sketch I made as a result of that experience.  I was taken with the colors, as well as, the birds, with how the purples and maroons looked so beautiful with the robin's plumage.
Creating a sketch deepens a memory with all of its sensory detail and adds to the enjoyment of the experience. The robins were so intent on feeding that they ignored my presence.  This made for some wonderful and close observations.  As I was considering birds to paint in my note card collection, the memory of this sketch came right to mind and became the inspiration and reference for this painting.  
In the painting I wanted to give more emphasis to the yellow glow behind the leaves in the background than I had in the sketch, so I began by laying down a variegated wash of yellows--WN Quinacridone gold, DVP Arylide yellow and WN New Gamboge.  I used four additional pigments in the painting:  WN French Ultramarine, WN Alizarin Crimson, WN Perylene Maroon, and WN Burnt Sienna.   
Above you see a sketchbook page of the colors I was using (with the exception of the square of Perylene Violet which I decided to not use).  French Ultramarine is a versatile blue shade.  Mixed with burnt sienna it makes wonderful neutrals.  Mixed with yellows, it becomes luscious greens.  Add a bit of it to red and you get rich purples. Ultramarine is one of my favorite colors because of that versatility.  The mixed hues that result help to unify the colors in the painting. I often create a page like the one you see above with the primary pigments in the palette, along with the mixes I will use. It gives me a fresh look at the pigments and a chance to consider how they will work with the subject at hand.
My initial washes were painted on wet paper and allowed to dry before continuing. In some areas, these washes turned out lighter than I intended.  As I added the bold colors to the leaves, and painted the robin, I began to see too many hard edges and the pale yellow washes seemed more and more disconnected from the leaves and robin. I realized that if I continued painting in this fashion, the leaves and robin would look like "cut-outs", disconnected entirely from the environment around them.  

My solution for this is to get out the spray bottle, add more color and mix things up a bit!  This is when  playing really begins!  

Next:  Bringing the leaves and background together with more color.    

Saturday, January 21, 2012

Gourd Art--Pyroengraving or Wood-burning an Art Design

The last three months of 2011 were busy months during which I painted four original watercolor images for my Autumn Birds collection and supervised the production of note cards featuring these images; created and edited the Discover Birds Activity Book, a joint project with the TN Ornithological Society, now available to help children get excited about birds; and created a new gourd art basket decorated with bird images at the special request of a friend.
Many hours go into the creation of a gourd art basket and while I was creating this piece, I took the time to photograph the process with the idea of creating a tutorial for those who wish to create gourd art, as well as, for those who wonder what goes into the process of creating one of my gourd art baskets.

I am devoting this post to a "how-to" tutorial that shows just one phase of the art-making process, the pyroengraving of an original design onto the gourd surface.
Only one bird art image is shown in the tutorial below, but this gourd art basket includes four bird images of different species placed around the gourd, as well as, the decorative design on the bottom (shown above) and near the rim, a trademark of all my gourd art baskets.  At the end of the post, you will find a link to my gourd art gallery showing all four art images decorating this gourd art basket.

TUTORIAL:  Pyrography--Burning Art onto a Hard-shell Gourd
Supplies you will need:
  • A cut, cleaned and dried hard shell gourd 
  • Wood burning system, preferably one with a temperature control; I use the Detail Master III
  • Flame resistant paper, also know as, pyro paper
  • A sketch, print or photo of the image you would like to transfer to the gourd surface
  • Pencil and soft art eraser
  • Scotch brand, "magic matte tape"
(Links to supply sources are found at the end of the tutorial)
Pyrography is the art of burning pictorial images onto a surface, such as, wood, leather or gourds, the most commonly know of which is burning on wood or wood-burning.  The words "pyrography" and "wood-burning" are terms that are interchangeable in common usage, and both are frequently used to refer to pyrography on any surface.  Hard shell gourds make a wonderful surface for applying pyroengraved images because the gourd's surface is both hard and porous.  For this reason,  it is also important to have a burning system that allows the temperature of the burning tip to be adjusted.

The hardness of the surface of gourds varies considerably according to the variety, the growing conditions and the length of time since the curing process.  You will also find variations on the surface of a single gourd.
I start my woodburning project by dividing the gourd surface into equal sections using pencil marks.  These marks provide a guide to placement of design elements, as well as, the main art image that you want to feature on the gourd surface.  Begin by drawing a circle around the center of the bottom of the gourd.  I do this free hand, but you can also use a pattern or tool.  You may later erase this circle or use it in your design, as I have done.
Divide this circle into eight equal parts by first dividing the circle in half, then into fourths, then into eighths.  Use your eye to determine if your spacing is fairly even and make corrections.  Extend the dividing lines all the way to the rim edge of the gourd. 
Above, you can see the division lines I have made on the circle.  You can also see how I used these lines as my placement guide for the smaller circles in my design,.  This is my copyrighted Sunwave© design that I use in both my gourd art and my jewelry.  With the help of the guide lines, the design is drawn free hand with a pencil, as shown.  The remainder of the design is created with my burning tool (shown below).  Note:  I loved art as a child and frequently doodled.  One of my repetitive doodles included drawing circles until I could get them nice and round!  This practice naturally re-surfaced in the creation of this original design.
You can create your own design using any geometric shapes, patterns from what you find in nature including, leaves and branches, moon shapes, stars, or any combination of shapes that you find appealing and express the mood you wish to create on the gourd surface.  You may have an art image in mind that will cover the entire gourd surface without an additional design element.  The possibilities for creating art for your gourd projects are limitless.
Transfering the Design to Pyro Paper:
Pyro paper is a kind of paper made with a coating that will not flame or catch fire when touched with a hot burning tool.  The paper will smoke some, scorch and burn away so good ventilation in your work area is required.

Above you see drawings I created for an illustrated activity book for children.   All of my designs come from orginal sketches that I create from observations and my photography of nature.  Since these were readily available, I incorporated them into the art on this gourd project.  There are also many images available on the internet and in books and magazines that are not copyrighted and may be used freely.

I resized each image to fit the space that would be available on the gourd surface, and using the microsoft text document program on my computer, arranged them all on one page.  I then printed the page onto pyro paper. As an alternative, you can draw or trace your images onto the pyro paper.

Next, cut out the individual image you want to burn onto the gourd surface and tape it to the gourd using Scotch matte transparent tape.  Mold the pryo paper to the shape of the gourd as you tape it, flattening the buckled areas.  Buckles/puckers in the paper will sometimes cause the paper to burn away before your burning tip has touched the surface causing your burn line to be less accurate.
You will be using this taped image as your guide to burn the outline of your image onto the gourd surface.  It does not serve well as a guide for detail, however, because as the paper burns away, changes in alignment may occur.  Your goal is to place burn mark outlines on the surface that can further help you in refining your design with your burning tool after the paper is pealed away.  Above, you see how the paper looks after the image has been burned.
When you have finished burning the image, peel away the paper, being careful to remove all of the tape, which may sometimes be difficult to see and may later show up as it resists an application of paint or dye.

Next, using a pencil and your original image to guide you, draw in any parts of the image that you may have missed while burning and further refine the details of the image.  Because this hummingbird image is placed to overlap the sunwave design above it, I have burned the hummingbird image first.  


In the image below, you see the finished detail in the hummingbird image and the addition of the burned sunwave design.    

The image is now ready for the application of paint and dye to complete the design.

Wood-burning systems can be found here:  Bonnie Gibson and Detail Master item #8421 (the burning system I currently use).  You may also try initially pyroengraving using a less expensive tool found at your local craft supply store.  These less expensive tools generally do not have a temperature control but can give you some experience and an idea of whether you will enjoy this way of creating art with gourds.

Pyro Paper (flame resistant paper) 

Where to buy gourds for your projects:
The cost of gourds varies depending on whether the gourd is cut and cleaned for you or whether you will handle this part of the preparation yourself.  Select firm, substantial weight gourds that are cured and dried for this type of project.  You want the best quality materials for an art project that takes many hours to create and will provide many years of enjoyment.


Sunday, January 8, 2012

Sandhill Cranes and Art

My crane observations go back a long way.  In fact, the experience of hearing and seeing my first sandhill cranes staging at the Hiwassee Wildlife Refuge in 1999, marked the beginning of a major change in my life--a change that moved me into my passion for wildlife conservation and creating art. The two are now inseparable.
Early gourd art pieces created in 2001-2002 and inspired by sandhill cranes and whooping cranes.

What's so special about cranes?  As Aldo Leopold put it in his book of essays, A Sand County Almanac:  "Our ability to perceive quality in nature begins, as in art, with the pretty.  It expands through successive stages of the beautiful to values as yet uncaptured by language.  The quality of cranes lies, I think, in this higher gamut, as yet beyond the reach of words."

Above, you see a painting I created in late November 2011 using one of my favorite sandhill crane reference images.  Two sandhill cranes with their "landing gear" down are floating in for a landing at the Hiwassee Wildlife Refuge.  I have always loved this posture.  The cranes hold their wings like parachutes and dangle their legs as they float down in preparation for landing.

I also selected this image as my cover illustration for my new children's activity book, the Discover Birds Activity Book.  A fun project!
This twelve-page booklet is sponsored by the Tennessee Ornithological Society (TOS) and will be available for the first time at the Tennessee Sandhill Crane Festival in Birchwood, TN this weekend, January 14th and 15th.  The idea of creating an activity book for the kids that attend the festival was conceived by friend and TOS member, Cyndi Routledge, who also secured the funding and arranged for the layout and printing.  I had the pleasure of creating the text and illustrations and I am delighted with the beautiful results.

The book includes bird illustrations to color, fun facts about wintering birds and conservation, and a challenging crossword puzzle to test what you've learned.   My hope is that we can expand this book in coming years and continue to inspire children and their interest in birds and bird conservation.
More about this book click here.

Ocean Trail at Rancho Palos Verdes Preserve, California--2015

Ocean Trail at Rancho Palos Verdes Preserve, California--2015

Joshua Tree National Forest, California, with son Chad and daughter Thuan--2015

Joshua Tree National Forest, California, with son Chad and daughter Thuan--2015
Photo credit: Thuan Tram

Bird banding with Mark Armstrong at Seven Islands State Birding Park - 2014

Bird banding with Mark Armstrong at Seven Islands State Birding Park - 2014
Photo courtesy of Jody Stone

Birds Close-up

Birds Close-up
Photo courtesy of Karen Wilkenson

Enjoying Gray Jays in Churchill, Manitoba

Enjoying Gray Jays in Churchill, Manitoba
Photo courtesy of Blue Sky Expeditions

A dog sled experience with Blue Sky Expeditions, Churchill, MB--2014

A dog sled experience with Blue Sky Expeditions, Churchill, MB--2014
Photo courtesy of Blue Sky Expeditions

Churchill, Manitoba--2014

Churchill, Manitoba--2014
Photo courtesy of Blue Sky

2014 Hummingbird Festival

2014 Hummingbird Festival
Photo courtesy of Jody Stone

Smithsonian National Zoo with one of my Whooping Crane art banners and son, John--2014

Smithsonian National Zoo with one of my Whooping Crane art banners and son, John--2014

Muir Woods on the Dipsea Trail at Stinson Beach, California--2014

Muir Woods on the Dipsea Trail at Stinson Beach, California--2014
Photo courtesy of Wendy Pitts Reeves

Checking out the gulls at Stinson Beach--2014

Checking out the gulls at Stinson Beach--2014
Photo courtesy of Wendy Pitts Reeves

Discovery Hike in Denali National Park and Preserve, Alaska--2012

Discovery Hike in Denali National Park and Preserve, Alaska--2012
Photo courtesy of Ruth Carter
Related Posts with Thumbnails