Sunday, January 29, 2012

The Yellow Glow Behind the Robin--Part II

At this point in my painting, my goal is to add more color to the lower leaves and background so they appear more connected.  In nature this naturally happens as light strikes the subject and surrounding colors are reflected in that light.  We seldom see all the edges of a leaf at a glance, for example.  We see enough to recognize the shape. Some areas will be sharp and clear, others will appear softened or fused with surrounding color and light.  
I chose to place the painting on a table easel for this application of wet-in-wet paint so that water and paint will coat the paper smoothly.  Setting the painting on an easel is one way to do this.  I also pick up the painting and change the angle to direct the flow of paint from time to time.  I use two large containers of water, allowing me to rinse the brush in one, and pick up clean water in the brush from the second.    This allows the paint to remain clear and bright when it mixes with the water in the brush.  
Above, I have wet the paper with my spray bottle and then applied brush strokes of New Gamboge, Quinacridone Gold and Perylene Maroon.  My spray bottle is actually an old hair spray pump bottle salvaged from years past when I used hair spray.  I prefer its fine mist.  As the paint mixture flows down the page, I am using a paper towel to collect the paint pooled on the edge of the tape.  If laid flat to dry, this excess paint and water will flow backward, leaving a washed out bloom. 
I have also tucked a rolled paper towel into the tray of the easel to catch the run off that occurs before I'm ready to wipe it.    
Above you see the additional color added to the lower left corner of the painting. Compare it to the pale color in the right hand corner.     
Above, I have placed a stroke of New Gamboge on the paper and diluted it by spraying it.  I follow this by adding more colors and allowing these to run together and blend on the paper.  You can see the change that occurs in the lower right hand corner below.    
Once this layer of color is dried, I can then paint the leaves and add more color to the surrounding background, a small area at a time as needed, leaving some leaf edges soft, some hard.  I can also add only a little defining color to part of a leaf, letting the rest of it blend with the background, or I can add a lot of detail as in the two larger leaves in front of the robin.   These variations add interest.   

When you are using a bright color in the background, such as the yellow that is used here, remember that you can alter it later with a glaze of another color.  As the painting progressed, I softened some of the yellow by adding a glaze of green (ultramarine mixed with arylide) to some areas, or a pale glaze of one of my reds to other areas.  
If you like color, variety, glazes, a chance to use wet-in-wet and create hard and soft edges, an "anything goes" approach to watercolor, fall leaves are a great subject to play with!

Part I of the Yellow Glow Behind the Robin
On this blog:  wet-in-wet demonstration

Wednesday, January 25, 2012

The Yellow Glow Behind the Robin

Sometimes we take the birds we commonly see for granted, simply because we see them everyday.  If you've never stopped to notice an American Robin, you should take some time to do that soon. Beautiful in coloration, timid at times, boisterous at others, it is a delight to watch their behavior.  
The painting above is one included in my Autumn Birds Note Cards.  The inspiration for this painting came from a whole flock of robins that descended on my dogwood trees a couple of fall seasons ago.  The trees were full of ripe red berries and the robins were making such a commotion with their chirping and fluttering as they plucked the berries, that I spent more than an hour watching and photographing them. Below, you see the initial sketch I made as a result of that experience.  I was taken with the colors, as well as, the birds, with how the purples and maroons looked so beautiful with the robin's plumage.
Creating a sketch deepens a memory with all of its sensory detail and adds to the enjoyment of the experience. The robins were so intent on feeding that they ignored my presence.  This made for some wonderful and close observations.  As I was considering birds to paint in my note card collection, the memory of this sketch came right to mind and became the inspiration and reference for this painting.  
In the painting I wanted to give more emphasis to the yellow glow behind the leaves in the background than I had in the sketch, so I began by laying down a variegated wash of yellows--WN Quinacridone gold, DVP Arylide yellow and WN New Gamboge.  I used four additional pigments in the painting:  WN French Ultramarine, WN Alizarin Crimson, WN Perylene Maroon, and WN Burnt Sienna.   
Above you see a sketchbook page of the colors I was using (with the exception of the square of Perylene Violet which I decided to not use).  French Ultramarine is a versatile blue shade.  Mixed with burnt sienna it makes wonderful neutrals.  Mixed with yellows, it becomes luscious greens.  Add a bit of it to red and you get rich purples. Ultramarine is one of my favorite colors because of that versatility.  The mixed hues that result help to unify the colors in the painting. I often create a page like the one you see above with the primary pigments in the palette, along with the mixes I will use. It gives me a fresh look at the pigments and a chance to consider how they will work with the subject at hand.
My initial washes were painted on wet paper and allowed to dry before continuing. In some areas, these washes turned out lighter than I intended.  As I added the bold colors to the leaves, and painted the robin, I began to see too many hard edges and the pale yellow washes seemed more and more disconnected from the leaves and robin. I realized that if I continued painting in this fashion, the leaves and robin would look like "cut-outs", disconnected entirely from the environment around them.  

My solution for this is to get out the spray bottle, add more color and mix things up a bit!  This is when  playing really begins!  

Next:  Bringing the leaves and background together with more color.    

Saturday, January 21, 2012

Gourd Art--Pyroengraving or Wood-burning an Art Design

The last three months of 2011 were busy months during which I painted four original watercolor images for my Autumn Birds collection and supervised the production of note cards featuring these images; created and edited the Discover Birds Activity Book, a joint project with the TN Ornithological Society, now available to help children get excited about birds; and created a new gourd art basket decorated with bird images at the special request of a friend.
Many hours go into the creation of a gourd art basket and while I was creating this piece, I took the time to photograph the process with the idea of creating a tutorial for those who wish to create gourd art, as well as, for those who wonder what goes into the process of creating one of my gourd art baskets.

I am devoting this post to a "how-to" tutorial that shows just one phase of the art-making process, the pyroengraving of an original design onto the gourd surface.
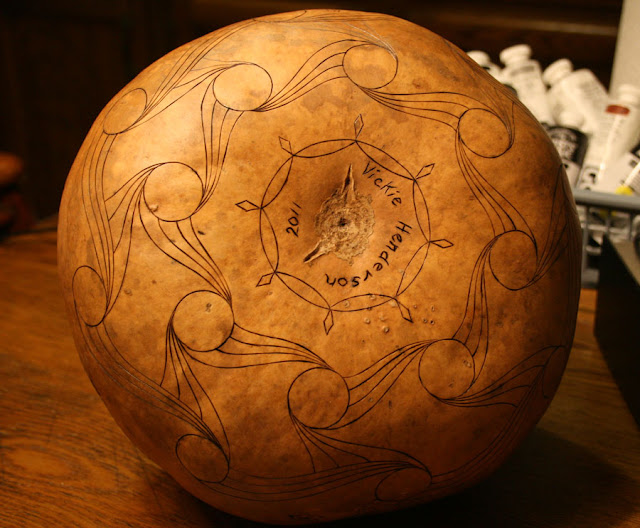
Only one bird art image is shown in the tutorial below, but this gourd art basket includes four bird images of different species placed around the gourd, as well as, the decorative design on the bottom (shown above) and near the rim, a trademark of all my gourd art baskets.  At the end of the post, you will find a link to my gourd art gallery showing all four art images decorating this gourd art basket.

TUTORIAL:  Pyrography--Burning Art onto a Hard-shell Gourd
Supplies you will need:
  • A cut, cleaned and dried hard shell gourd 
  • Wood burning system, preferably one with a temperature control; I use the Detail Master III
  • Flame resistant paper, also know as, pyro paper
  • A sketch, print or photo of the image you would like to transfer to the gourd surface
  • Pencil and soft art eraser
  • Scotch brand, "magic matte tape"
(Links to supply sources are found at the end of the tutorial)
Pyrography is the art of burning pictorial images onto a surface, such as, wood, leather or gourds, the most commonly know of which is burning on wood or wood-burning.  The words "pyrography" and "wood-burning" are terms that are interchangeable in common usage, and both are frequently used to refer to pyrography on any surface.  Hard shell gourds make a wonderful surface for applying pyroengraved images because the gourd's surface is both hard and porous.  For this reason,  it is also important to have a burning system that allows the temperature of the burning tip to be adjusted.

The hardness of the surface of gourds varies considerably according to the variety, the growing conditions and the length of time since the curing process.  You will also find variations on the surface of a single gourd.
I start my woodburning project by dividing the gourd surface into equal sections using pencil marks.  These marks provide a guide to placement of design elements, as well as, the main art image that you want to feature on the gourd surface.  Begin by drawing a circle around the center of the bottom of the gourd.  I do this free hand, but you can also use a pattern or tool.  You may later erase this circle or use it in your design, as I have done.
Divide this circle into eight equal parts by first dividing the circle in half, then into fourths, then into eighths.  Use your eye to determine if your spacing is fairly even and make corrections.  Extend the dividing lines all the way to the rim edge of the gourd. 
Above, you can see the division lines I have made on the circle.  You can also see how I used these lines as my placement guide for the smaller circles in my design,.  This is my copyrighted Sunwave© design that I use in both my gourd art and my jewelry.  With the help of the guide lines, the design is drawn free hand with a pencil, as shown.  The remainder of the design is created with my burning tool (shown below).  Note:  I loved art as a child and frequently doodled.  One of my repetitive doodles included drawing circles until I could get them nice and round!  This practice naturally re-surfaced in the creation of this original design.
You can create your own design using any geometric shapes, patterns from what you find in nature including, leaves and branches, moon shapes, stars, or any combination of shapes that you find appealing and express the mood you wish to create on the gourd surface.  You may have an art image in mind that will cover the entire gourd surface without an additional design element.  The possibilities for creating art for your gourd projects are limitless.
Transfering the Design to Pyro Paper:
Pyro paper is a kind of paper made with a coating that will not flame or catch fire when touched with a hot burning tool.  The paper will smoke some, scorch and burn away so good ventilation in your work area is required.

Above you see drawings I created for an illustrated activity book for children.   All of my designs come from orginal sketches that I create from observations and my photography of nature.  Since these were readily available, I incorporated them into the art on this gourd project.  There are also many images available on the internet and in books and magazines that are not copyrighted and may be used freely.

I resized each image to fit the space that would be available on the gourd surface, and using the microsoft text document program on my computer, arranged them all on one page.  I then printed the page onto pyro paper. As an alternative, you can draw or trace your images onto the pyro paper.

Next, cut out the individual image you want to burn onto the gourd surface and tape it to the gourd using Scotch matte transparent tape.  Mold the pryo paper to the shape of the gourd as you tape it, flattening the buckled areas.  Buckles/puckers in the paper will sometimes cause the paper to burn away before your burning tip has touched the surface causing your burn line to be less accurate.
You will be using this taped image as your guide to burn the outline of your image onto the gourd surface.  It does not serve well as a guide for detail, however, because as the paper burns away, changes in alignment may occur.  Your goal is to place burn mark outlines on the surface that can further help you in refining your design with your burning tool after the paper is pealed away.  Above, you see how the paper looks after the image has been burned.
When you have finished burning the image, peel away the paper, being careful to remove all of the tape, which may sometimes be difficult to see and may later show up as it resists an application of paint or dye.

Next, using a pencil and your original image to guide you, draw in any parts of the image that you may have missed while burning and further refine the details of the image.  Because this hummingbird image is placed to overlap the sunwave design above it, I have burned the hummingbird image first.  


In the image below, you see the finished detail in the hummingbird image and the addition of the burned sunwave design.    
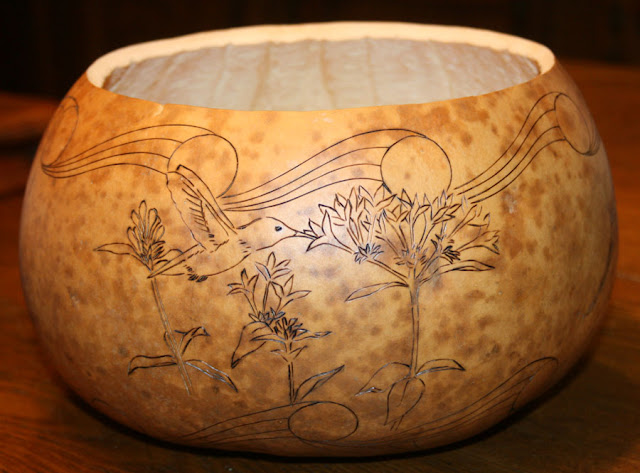
The image is now ready for the application of paint and dye to complete the design.

Wood-burning systems can be found here:  Bonnie Gibson and Detail Master item #8421 (the burning system I currently use).  You may also try initially pyroengraving using a less expensive tool found at your local craft supply store.  These less expensive tools generally do not have a temperature control but can give you some experience and an idea of whether you will enjoy this way of creating art with gourds.

Pyro Paper (flame resistant paper) 

Where to buy gourds for your projects:
The cost of gourds varies depending on whether the gourd is cut and cleaned for you or whether you will handle this part of the preparation yourself.  Select firm, substantial weight gourds that are cured and dried for this type of project.  You want the best quality materials for an art project that takes many hours to create and will provide many years of enjoyment.


Sunday, January 8, 2012

Sandhill Cranes and Art

My crane observations go back a long way.  In fact, the experience of hearing and seeing my first sandhill cranes staging at the Hiwassee Wildlife Refuge in 1999, marked the beginning of a major change in my life--a change that moved me into my passion for wildlife conservation and creating art. The two are now inseparable.
Early gourd art pieces created in 2001-2002 and inspired by sandhill cranes and whooping cranes.

What's so special about cranes?  As Aldo Leopold put it in his book of essays, A Sand County Almanac:  "Our ability to perceive quality in nature begins, as in art, with the pretty.  It expands through successive stages of the beautiful to values as yet uncaptured by language.  The quality of cranes lies, I think, in this higher gamut, as yet beyond the reach of words."

Above, you see a painting I created in late November 2011 using one of my favorite sandhill crane reference images.  Two sandhill cranes with their "landing gear" down are floating in for a landing at the Hiwassee Wildlife Refuge.  I have always loved this posture.  The cranes hold their wings like parachutes and dangle their legs as they float down in preparation for landing.

I also selected this image as my cover illustration for my new children's activity book, the Discover Birds Activity Book.  A fun project!
This twelve-page booklet is sponsored by the Tennessee Ornithological Society (TOS) and will be available for the first time at the Tennessee Sandhill Crane Festival in Birchwood, TN this weekend, January 14th and 15th.  The idea of creating an activity book for the kids that attend the festival was conceived by friend and TOS member, Cyndi Routledge, who also secured the funding and arranged for the layout and printing.  I had the pleasure of creating the text and illustrations and I am delighted with the beautiful results.

The book includes bird illustrations to color, fun facts about wintering birds and conservation, and a challenging crossword puzzle to test what you've learned.   My hope is that we can expand this book in coming years and continue to inspire children and their interest in birds and bird conservation.
More about this book click here.

Ocean Trail at Rancho Palos Verdes Preserve, California--2015

Ocean Trail at Rancho Palos Verdes Preserve, California--2015

Joshua Tree National Forest, California, with son Chad and daughter Thuan--2015

Joshua Tree National Forest, California, with son Chad and daughter Thuan--2015
Photo credit: Thuan Tram

Bird banding with Mark Armstrong at Seven Islands State Birding Park - 2014

Bird banding with Mark Armstrong at Seven Islands State Birding Park - 2014
Photo courtesy of Jody Stone

Birds Close-up

Birds Close-up
Photo courtesy of Karen Wilkenson

Enjoying Gray Jays in Churchill, Manitoba

Enjoying Gray Jays in Churchill, Manitoba
Photo courtesy of Blue Sky Expeditions

A dog sled experience with Blue Sky Expeditions, Churchill, MB--2014

A dog sled experience with Blue Sky Expeditions, Churchill, MB--2014
Photo courtesy of Blue Sky Expeditions

Churchill, Manitoba--2014

Churchill, Manitoba--2014
Photo courtesy of Blue Sky

2014 Hummingbird Festival

2014 Hummingbird Festival
Photo courtesy of Jody Stone

Smithsonian National Zoo with one of my Whooping Crane art banners and son, John--2014

Smithsonian National Zoo with one of my Whooping Crane art banners and son, John--2014

Muir Woods on the Dipsea Trail at Stinson Beach, California--2014

Muir Woods on the Dipsea Trail at Stinson Beach, California--2014
Photo courtesy of Wendy Pitts Reeves

Checking out the gulls at Stinson Beach--2014

Checking out the gulls at Stinson Beach--2014
Photo courtesy of Wendy Pitts Reeves

Discovery Hike in Denali National Park and Preserve, Alaska--2012

Discovery Hike in Denali National Park and Preserve, Alaska--2012
Photo courtesy of Ruth Carter
Related Posts with Thumbnails