The last three months of 2011 were busy months during which I painted four original watercolor images for my Autumn Birds collection and supervised the production of note cards featuring these images; created and edited the
Discover Birds Activity Book, a joint project with the TN Ornithological Society, now available to help children get excited about birds; and
created a new gourd art basket decorated with bird images at the special request of a friend.
Many hours go into the creation of a gourd art basket and while I was creating this piece, I took the time to photograph the process with the idea of creating a tutorial for those who wish to create gourd art, as well as, for those who wonder what goes into the process of creating one of my gourd art baskets.
I am devoting this post to a "how-to" tutorial that shows just one phase of the art-making process, the pyroengraving of an original design onto the gourd surface.
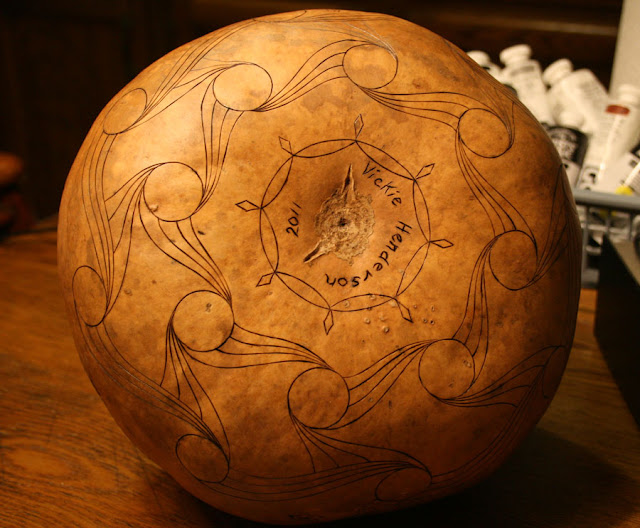
Only one bird art image is shown in the tutorial below, but this gourd art basket includes four bird images of different species placed around the gourd, as well as, the decorative design on the bottom (shown above) and near the rim, a trademark of all my gourd art baskets. At the end of the post, you will find a link to my gourd art gallery showing all four art images decorating this gourd art basket.
TUTORIAL: Pyrography--Burning Art onto a Hard-shell Gourd
Supplies you will need:
- A cut, cleaned and dried hard shell gourd
- Wood burning system, preferably one with a temperature control; I use the Detail Master III
- Flame resistant paper, also know as, pyro paper
- A sketch, print or photo of the image you would like to transfer to the gourd surface
- Pencil and soft art eraser
- Scotch brand, "magic matte tape"
(Links to supply sources are found at the end of the tutorial)
Pyrography is the art of burning pictorial images onto a surface, such as, wood, leather or gourds, the most commonly know of which is burning on wood or wood-burning. The words "pyrography" and "wood-burning" are terms that are interchangeable in common usage, and both are frequently used to refer to pyrography on any surface. Hard shell gourds make a wonderful surface for applying pyroengraved images because the gourd's surface is both hard and porous. For this reason, it is also important to have a burning system that allows the temperature of the burning tip to be adjusted.
The hardness of the surface of gourds varies considerably according to the variety, the growing conditions and the length of time since the curing process. You will also find variations on the surface of a single gourd.
I start my woodburning project by dividing the gourd surface into equal sections using pencil marks. These marks provide a guide to placement of design elements, as well as, the main art image that you want to feature on the gourd surface. Begin by drawing a circle around the center of the bottom of the gourd. I do this free hand, but you can also use a pattern or tool. You may later erase this circle or use it in your design, as I have done.
Divide this circle into eight equal parts by first dividing the circle in half, then into fourths, then into eighths. Use your eye to determine if your spacing is fairly even and make corrections. Extend the dividing lines all the way to the rim edge of the gourd.
Above, you can see the division lines I have made on the circle. You can also see how I used these lines as my placement guide for the smaller circles in my design,. This is my copyrighted Sunwave© design that I use in both my gourd art and my jewelry. With the help of the guide lines, the design is drawn free hand with a pencil, as shown. The remainder of the design is created with my burning tool (shown below). Note: I loved art as a child and frequently doodled. One of my repetitive doodles included drawing circles until I could get them nice and round! This practice naturally re-surfaced in the creation of this original design.
You can create your own design using any geometric shapes, patterns from what you find in nature including, leaves and branches, moon shapes, stars, or any combination of shapes that you find appealing and express the mood you wish to create on the gourd surface. You may have an art image in mind that will cover the entire gourd surface without an additional design element. The possibilities for creating art for your gourd projects are limitless.
Transfering the Design to Pyro Paper:
Pyro paper is a kind of paper made with a coating that will not flame or catch fire when touched with a hot burning tool. The paper will smoke some, scorch and burn away so good ventilation in your work area is required.
Above you see drawings I created for an illustrated activity book for children. All of my designs come from orginal sketches that I create from observations and my photography of nature. Since these were readily available, I incorporated them into the art on this gourd project. There are also many images available on the internet and in books and magazines that are not copyrighted and may be used freely.
I resized each image to fit the space that would be available on the gourd surface, and using the microsoft text document program on my computer, arranged them all on one page. I then printed the page onto pyro paper. As an alternative, you can draw or trace your images onto the pyro paper.
Next, cut out the individual image you want to burn onto the gourd surface and tape it to the gourd using Scotch matte transparent tape. Mold the pryo paper to the shape of the gourd as you tape it, flattening the buckled areas. Buckles/puckers in the paper will sometimes cause the paper to burn away before your burning tip has touched the surface causing your burn line to be less accurate.
You will be using this taped image as your guide to burn the outline of your image onto the gourd surface. It does not serve well as a guide for detail, however, because as the paper burns away, changes in alignment may occur. Your goal is to place burn mark outlines on the surface that can further help you in refining your design with your burning tool after the paper is pealed away. Above, you see how the paper looks after the image has been burned.
When you have finished burning the image, peel away the paper, being careful to remove all of the tape, which may sometimes be difficult to see and may later show up as it resists an application of paint or dye.
Next, using a pencil and your original image to guide you, draw in any parts of the image that you may have missed while burning and further refine the details of the image. Because this hummingbird image is placed to overlap the sunwave design above it, I have burned the hummingbird image first.
In the image below, you see the finished detail in the hummingbird image and the addition of the burned sunwave design.
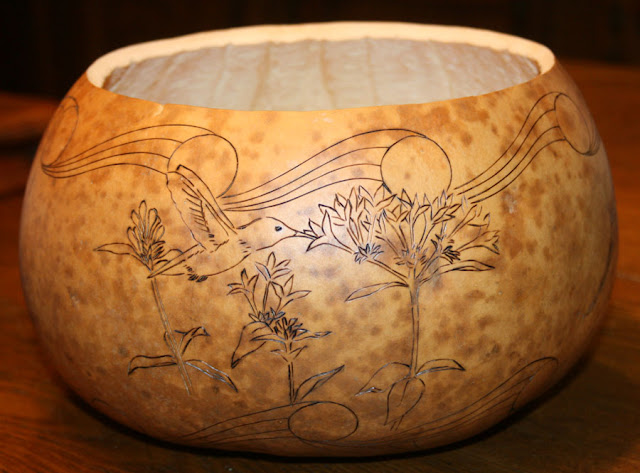
The image is now ready for the application of paint and dye to complete the design.
Wood-burning systems can be found here: Bonnie Gibson and Detail Master item #8421 (the burning system I currently use). You may also try initially pyroengraving using a less expensive tool found at your local craft supply store. These less expensive tools generally do not have a temperature control but can give you some experience and an idea of whether you will enjoy this way of creating art with gourds.
Pyro Paper (flame resistant paper)
Where to buy gourds for your projects:
The cost of gourds varies depending on whether the gourd is cut and cleaned for you or whether you will handle this part of the preparation yourself. Select firm, substantial weight gourds that are cured and dried for this type of project. You want the best quality materials for an art project that takes many hours to create and will provide many years of enjoyment.


Wowzers Vickie, what a fabulous job you did on this gourd and the tutorial is wonderful. Simply beautiful!
ReplyDeleteThank you, Teri! I wish for more hours in the day. There are far too many ways to enjoy art and nature!
ReplyDeleteOMG Vickie, what an intricate process! But with such BEAUTIFUL results! I'm in awe of your gourd art, it is absolutely amazing! Thank you for showing us this process, it's wonderful!
ReplyDeleteThank you so much! I am so new to gourd art and I really learned a lot here!
ReplyDeleteIt is such a pleasure to browse through this blogspot with a rich tutorial on birds and art. Your art expression is lovely and thanks for sharing. I always enjoy and wonder what I'll find on this site with each browse.
ReplyDelete