Showing posts with label softening edges. Show all posts

Sunday, November 10, 2013

Fun with Fall Leaves--Creating Layers

True to the nature of autumn, rain and winds have blown many leaves off our trees creating a bed of colorful leaves on the ground.  Painting layers of leaves is a fun way to practice negative painting, glazing with thin layers of color, and softening edges--three skills you will use over and over again while painting. 
Visually, lighter objects in a painting move forward.  Darker objects move backward. This is one of the ways we create depth in a painting. In negative painting we are painting the negative space around the subject. In this case, when we paint the areas around the leaves, we are also creating a darker layer. When we add a leaf to this darker area, the leaf appears to move farther away visually.  
   
To create a painting with layers of leaves, select three primary colors to use in your painting--a red, blue and yellow. You can mix additional colors from these three, such as mixing blue and red, to make purple. I selected Phthalo blue, Aureolin for my yellow, and Permanent Alizarin Crimson for my red. I also used New Gamboge, a rich shade of yellow, and Burnt Sienna to begin the first layer.     
Begin by taping your paper to a backboard on all sides. A one-fourth sheet of watercolor paper (11 x 15") will give you plenty of room to build your leaf layers. The demonstration is on a 9 x 12 inch sheet. I'm using Arches 140# cold press paper. 

Wet your paper with a spray bottle or by brushing clear water across the paper. Pour off excess water by holding your paper vertically and wiping away the drips that collect at the edge of the tape.  When the paper has had time to absorb the water, create a juicy multi-colored wash on the paper with the lightest shades of the colors you've selected.  I chose to use shades of yellow and burnt sienna. Let this first layer dry completely.
Draw or trace a leaf on the dry wash, as above. Create a background for that leaf by painting a thin layer of color around its edges and brushing that color out until the edge disappears (known as soft edges or losing edges).  
To soften the edges, rinse your brush with clear water and brush the damp brush across the edges of the glaze. When this glaze is completely dry, draw another leaf and create a glaze around that leaf, letting it dry completely before adding the next. As you add leaves, draw the leaves so they are partially hidden under the leaf before it. As you work, notice how the water and pigment interact and make adjustments to how much water you use if needed.    
Above, you see a bloom (upper right) created by too much water in relation to pigment. The water moved the pigment beyond the softened edge.  You may find that you get the mix of water and pigment just right sometimes and other times, not. Sometimes you may forget to let the glaze dry. Notice what happens.  Explore and play.
The smoothness of my layers improved with practice.  Below, you can see the progression of the layers and how the painting begins to change with each additional glaze.  
As I worked, I noticed that I liked the way the greens began to cool down the yellows. I also liked seeing the pigment under the glaze shining through.   
Could you see the leaves moving backward as you glazed?  What did you notice about color? I enjoyed watching the greens on the right side of my painting (below) turn to that beautiful shade of blue. Purple mixed from the same blue created a lovely accent.
Below is another one of my explorations on an 11 x 15 inch quarter sheet of Arches 140# cold press paper. 
And here's another one below, created some time ago, with iris blossoms and leaves. 

Links and resources:

Sunday, August 15, 2010

Hummingbird and Downy Woodpecker on Nectar Feeder

If you love nature and you love to recreate what you see and experience in watercolor, there couldn't be anything more fun than diving back into a subject and watching it come to life in a painting.  When it comes to birds, that could also mean tripling and quadrupling your fun!
It has been fun on top of fun to hear and witness this male Downy woodpecker visiting my nectar feeders intended for tiny hummingbirds.  But top it off with interactions between the two species and smiles just keep coming.

Painting this sketch had the same effect.  I smiled a lot.  And when you're smiling there is no worry about outcome.  You're just loving your subject and loving the opportunity to give it center stage.  And there's a number of ways to create that stage, among them, painting light against dark, soft against hard, and color that leads the eye through the painting.  I often approach these elements intuitively
I chose my background colors in this sketch first, focusing on the greens of the trees and the light in the spaces in the unfocused background.  A principle I learned from my long-time watercolor mentor and instructor, Ann K Lindsay--the fewer colors you use, the more unified your painting.   I've found this to be excellent advise that stuck with me and greatly simplifies decisions!
In this sketch my primary colors are DVP Cobalt Blue , WN Quinacridone Gold for my yellow, and DVP Permanent Rose for my red.  (Note: brands with the same color name vary in actual color.  WN stands for Winsor & Newton brand paint, DVP for Da Vinci).  The rest of my colors consisted of two neutrals and sap green, all used to alter the shades of the above three primaries:  DVP Sap Green, to add a little warmth to green made with the gold and blue; WN Van Dyke Brown, used with cobalt to make black; WN Burnt Sienna used with rose to warm it.  I also use burnt sienna with blue to make grays, adding a touch of the other colors on the palette as needed.  
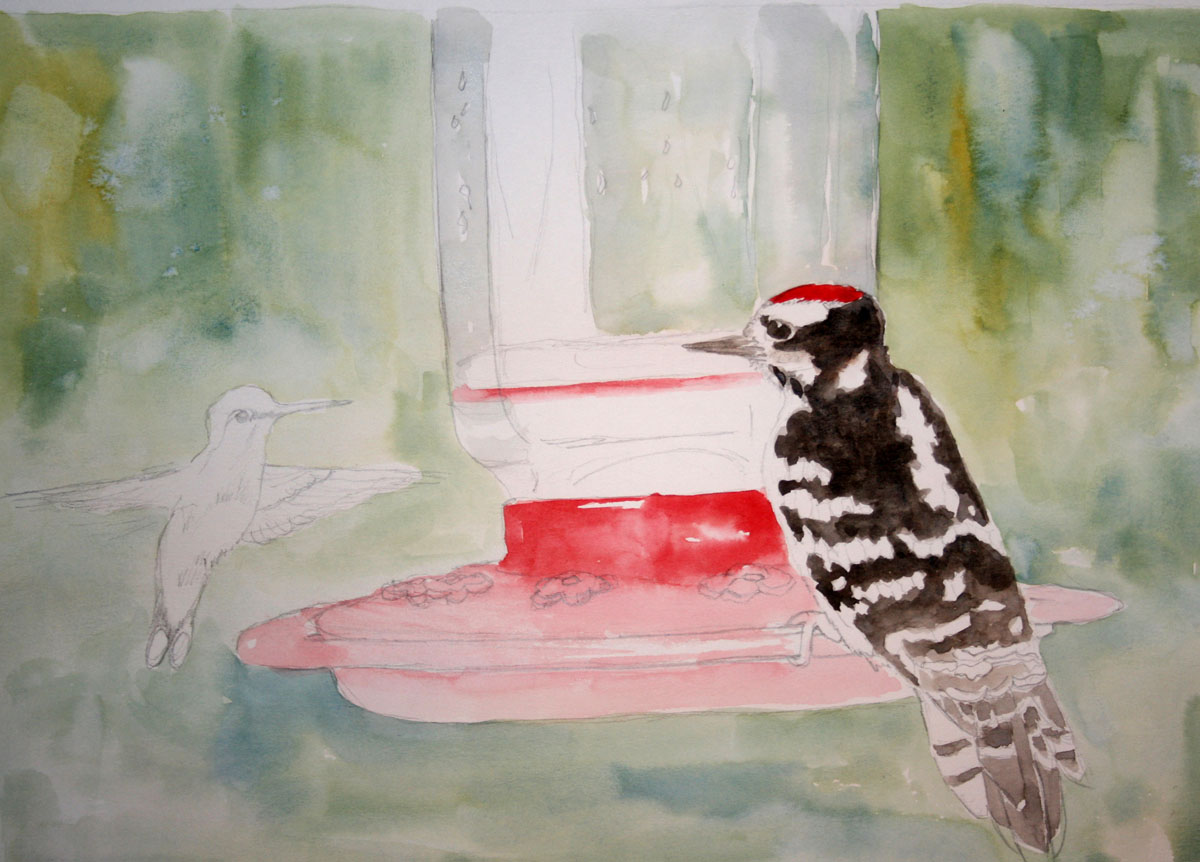
As I'm working on the light washes, I'm making a map of sorts.  I'm aware that my hummer and the water in the feeder will both be the same colors as the background.  This means I have to draw the viewers eye to my subject with the placement of values, that is, the positioning of darks and lights.  At this point (above), I also add color to the nectar container which reflects the background, and to the water in the feeder as a reference for these values.  The water and the feeder represent my lightest lights.

The hummer is next, creating wings that have a fairy-like movement of 40 to 80 beats per second.


To soften edges on the hummer's wing, I laid down paint strokes, rinsed my brush, blotting excess water from the brush with a sponge or paper towel, then brushed along the edge of the paint.  The paint edge is softened by the  moisture from the brush.  The amount of water you leave in the brush controls how far the pigment will spread from the original line.  

One way to suggest hummer wing movement is illustrated below--a combination of disconnected shapes, blurs, a mix of hard and softened lines.
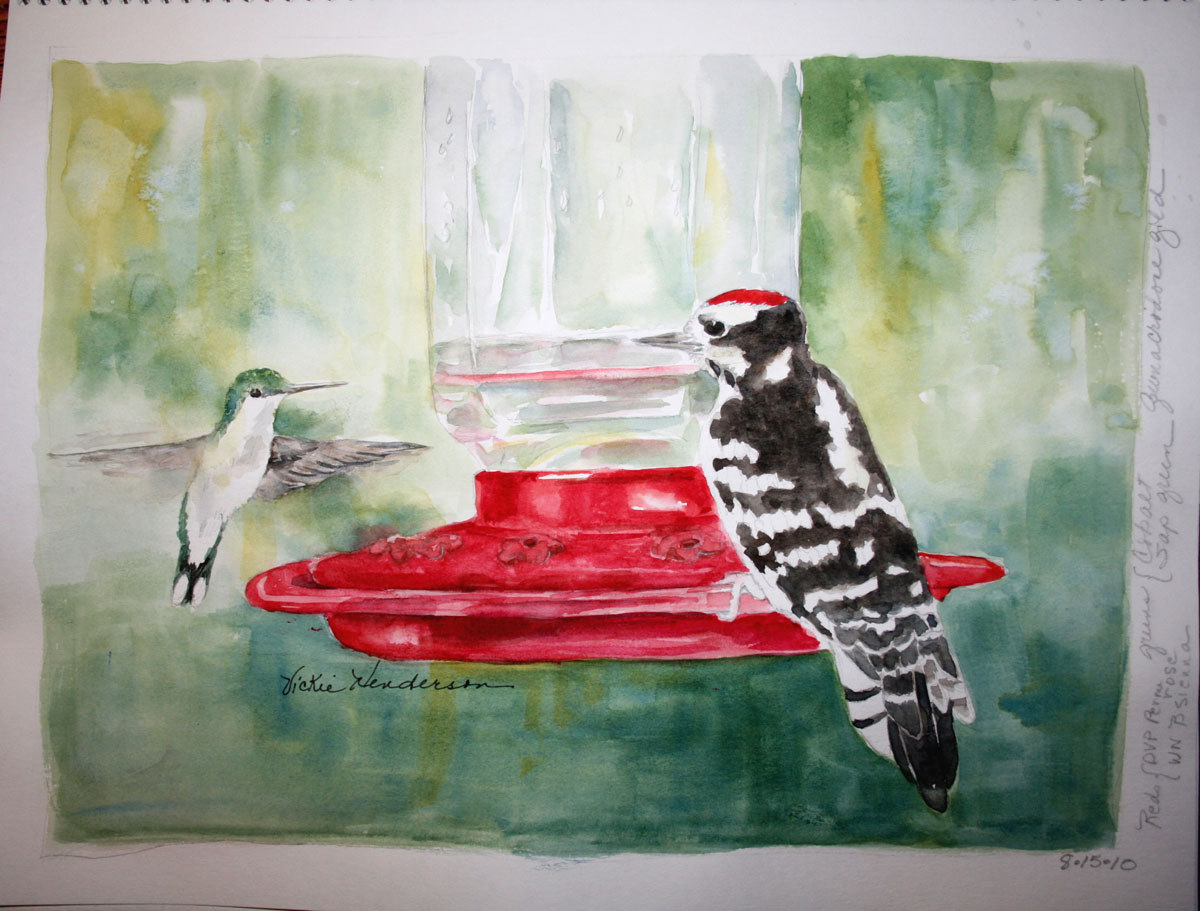
Below is the almost finished sketch, created in one of my favorite sketchbooks made by Aquabee, on 11 x 14 paper.  What made me realize it wasn't quite finished was a glimpse at an LCD image on my camera that highlighted the widely separated gold areas.    
The yellow in this sketch is like an accessory with a special function.  It either helps move the eye through the painting or it distracts, especially since there is no yellow in my two stars.  So, I added yellow to areas where 'my eye wanted to see yellow', moving left to right from one side of the painting to the other, dabs of yellow glaze leading through the two birds.

You may already know how this dictate-from-the-eyes feels.  It's a sensation that is visually uncomfortable, that is, it bothers until the correction is made.  And when it's right, you know it--your eyes are happy again.  See what you think by comparing the finished sketch below to the one above.
In bird-watching, the intuitive ability to identify a bird by its shape and movement is referred to as 'jizz'.  It's a wholistic and instant recognition.  It's learned.  Painting works the same way.  Besides helping you learn the skills of manipulating water and pigment on paper, practice develops jizz, your eye's intuitive ability to know what your painting needs in order to please you.  


Ocean Trail at Rancho Palos Verdes Preserve, California--2015

Ocean Trail at Rancho Palos Verdes Preserve, California--2015

Joshua Tree National Forest, California, with son Chad and daughter Thuan--2015

Joshua Tree National Forest, California, with son Chad and daughter Thuan--2015
Photo credit: Thuan Tram

Bird banding with Mark Armstrong at Seven Islands State Birding Park - 2014

Bird banding with Mark Armstrong at Seven Islands State Birding Park - 2014
Photo courtesy of Jody Stone

Birds Close-up

Birds Close-up
Photo courtesy of Karen Wilkenson

Enjoying Gray Jays in Churchill, Manitoba

Enjoying Gray Jays in Churchill, Manitoba
Photo courtesy of Blue Sky Expeditions

A dog sled experience with Blue Sky Expeditions, Churchill, MB--2014

A dog sled experience with Blue Sky Expeditions, Churchill, MB--2014
Photo courtesy of Blue Sky Expeditions

Churchill, Manitoba--2014

Churchill, Manitoba--2014
Photo courtesy of Blue Sky

2014 Hummingbird Festival

2014 Hummingbird Festival
Photo courtesy of Jody Stone

Smithsonian National Zoo with one of my Whooping Crane art banners and son, John--2014

Smithsonian National Zoo with one of my Whooping Crane art banners and son, John--2014

Muir Woods on the Dipsea Trail at Stinson Beach, California--2014

Muir Woods on the Dipsea Trail at Stinson Beach, California--2014
Photo courtesy of Wendy Pitts Reeves

Checking out the gulls at Stinson Beach--2014

Checking out the gulls at Stinson Beach--2014
Photo courtesy of Wendy Pitts Reeves

Discovery Hike in Denali National Park and Preserve, Alaska--2012

Discovery Hike in Denali National Park and Preserve, Alaska--2012
Photo courtesy of Ruth Carter
Related Posts with Thumbnails